 |
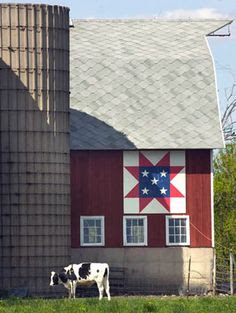
While out driving on backcountry roads with the hubby I saw a barn quilt. We have quite a few barn quilts in our area and nearby counties, so it wasn't the first I've ever seen. But since starting to quilt they have been catching my eye even more.
So finally, this last winter and with lockdowns going on I decided to paint a barn quilt for one of our pole barns.
I really love most versions of star quilt patterns so I picked a star for this barn quilt.
I find inspiration on Pinterest for recipes, crafts and parties so also went there for my barn quilt. Who else just loves Pinterest?! You really don't want to know how many pins I have, it's embarrassing!ple
Here are a couple barn quilt examples from Pinterest.
If you haven't heard there are even barn quilt trails! Hanging barn quilts and signs on barns has been around for a long time and many Amish farms had painted signs on their barns. But in recent years it has had renewed interest and driving tour maps were even created. Now you can drive from barn to barn viewing the barn quilts in most counties in Ohio and in several states!
"The first quilt trail was created in Adams County, Ohio, in 2001 by Donna Sue Groves. She wanted to honor her mother, Maxine, and her quilting art by painting a quilt block on their tobacco barn. In talking with friends and neighbors, Donna Sue realized that the project had wide appeal and also could be beneficial to the community as a means to bring tourism and economic development. Instead of a single personal tribute, she worked with the community to create a “clothesline of quilts,” which began with an Ohio Star, dedicated in 2001."
So for my barn quilt, I first designed it on graph paper. I drew it up the same way I design my quilts, with each square on the graph paper representing a measurement.
For wood, I decided to use a 3/4 inch thick piece of plywood cut 4 feet by 4 feet. An 8 feet x 4 feet piece of plywood was the wrong shape for my design, and using two would have been way too big for us to even handle or be able to attach to our pole barn. A 4 feet x 4 feet size was manageable.
After designing the star on graph paper I used colored pencils to decide on the paint colors.
I then drew the design onto the 4' x 4' plywood, first drawing squares, then marking off the design. Working with just 2 or 3 squares at a time I started painting. It took me a few days because I had to let the triangles dry before I could paint the ones next to each other. And most needed two to three coats of paint.
 |
| Nearly finished painting |
 |
| I had lots of touch-up to do |
When the painting was finished and dry, I gave the barn quilt 3 or 4 coats of varnish. I also finished the edges of the plywood with a frame made from 1 x 2 strips of wood.
 |
| Adding the frame |
 |
| Top coat |
Once the weather improved and spring was finally here our son Daniel came over and helped my husband hang my barn quilt on our pole barn nearest the road. And we love it!
As I do with all my quilts, I gave my barn quilt a name, it's called "Color Wheel Star Barn Quilt"
And all my quilts have labels so I wrote on the back the quilt name, date I made it, my name, and city and state.
Now that we are nearing the end of summer I'm thinking I may paint another barn quilt for our goat barn this coming winter. That is if I don't find 20 other things on Pinterest to make, haha.
Hoping you've had a great summer,
Elizabeth


