I just love flowering clematis vines!
There are so many different colors and types and
all are beautiful growing up a trellis, over an arbor, up a lamppost, along a fence, or just anywhere really.
The best way to grow clematis is from clematis
cuttings.
Propagation is pretty easy and you can have anywhere from a
50% to up to a 90% success rate.
The Clematis is in the Buttercup family and hundreds of
species and cultivars of clematis exist around the world.
The popular vine is
available in single- and double-bloom varieties, in dozens of colors that often
change as the plant grows, and in cultivars that grow as high as 30 feet or
remain about 6 to 8 feet.
Certain clematis vines are winter hardy even to zone 3, while others are hardy in zones 4 through 9. Clematis originated in Europe and Asia and the late 1800s brought about numerous varieties through breeding and cross-pollination.
The wild Clematis species native to China made their way into Japanese gardens by the 17th century. And the Japanese garden selections were the first exotic clematises to reach European gardens in the 18th century.
Clematis pests and diseases include powdery
mildew, slugs, and snails, scale insects, aphids, earwigs,
and green flower disease, but I have found that once established the vine is
pretty hardy and lasts for years.
 |
| Rooting hormone |
Supplies You’ll Need:
Small pot
Pro-Mix, Sand and Peat mix or other rich soil blends
Pruning shears or scissors
Container of water
Rooting Hormone
Clematis clipping
Here’s How To Do It:
First, the clematis shoots should be cut from a vine that is
half green wood, which means a stem that has just started to become hard or
brown wood.
Propagation should be done from a healthy clematis vine in late
spring to early summer.
 |
| Clematis vine clippings |
Try to cut off a 1 to 3-foot section from the vine if possible so you have more starts. If that’s not possible at least get a clipping big enough for one start.
If you are not able to immediately prepare the shoots for
potting, place them in a plastic bag with water or use a moist paper towel to
keep the clipping moist and stop it from wilting.
Once ready, chip about a 3 to 4-inch section from the shoot, making sure to have at least one or two nodes (joints) on each clipping.
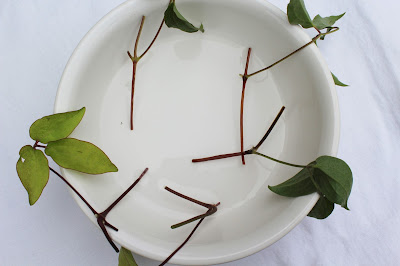
Remove most of the leaves. Place each clipping end into water and set aside.
Fill a small pot for each clipping with the rich soil
blend. I bought Miracle Grow brand pre-packaged
potting soil blend. Wet the soil with water until moist but not soaked.
Next, use a pencil or pinky finger to make a hole in the soil
to insert the clipping. This is to make
sure you don’t knock off the rooting hormone when inserting the clipping into
the dirt.
 |
| Place ends of clippings into water |
Working with one clipping at a time, remove the clipping
from the water and dip into the rooting hormone, making sure to coat the end
well.
 |
| Dip clipping end into rooting hormone |
Insert the end of the clipping with the rooting hormone into
the hole in the soil.
Press the soil firmly around the cutting and water slightly
if needed but not too wet.
 |
| Water just until damp |
Place the pots into a Ziploc bag, leaving some of the top
open for ventilation. The plastic bag will help retain heat and humidity.
Place the pots in a shady but warm location. Rooting is best
achieved with high humidity and placed in a well-lit room but with indirect
light.
 |
| Place pot in a Ziploc bag |
You should have new root growth within a month or maybe just
a little longer.
A good indicator that the propagation is working and roots
are growing are when the leaves appear to perk up. You can check by looking for
roots emerging through the drainage holes at the bottom of the pot.
 |
| Multiple starts from different clematis vines |
Once a significant root system is established you can transplant
to a permanent location, but the best thing to do to ensure the survival of the
vine is to allow the plant to grow to a decent size and plant outside the
following spring.
To plant outside dig an 8-inch hole and add amendments or
composted material to the soil if necessary.
Our soil here is very clayey so I must amend it anytime I plant
something.
Carefully knock the plant out
of its container and set it into the hole, keeping as much of the original soil
around the roots as possible. Fill the
hole, pat the soil lightly, and water.
Tie the main stem to a small stake or trellis. Apply plant food after new growth
starts.
Happy Gardening!


Hi there! This is my first comment here so I just wanted to give a quick shout out and say I truly enjoy reading through your blog posts. Thank you so much for sharing your ideas!
ReplyDelete
ReplyDeleteI am trying this, I love Clematis. Keep on writing, great job!
I have six small pots in my kitchen window right now. I'm sure you will be able to start them too, good luck!
ReplyDeleteWay cool! I never thought of doing this! I appreciate you posting this article and directions, looks easy, and the rest of your site is extremely good too. Tim
ReplyDeleteThanks Tim
ReplyDelete