| My daughter Alexis and I decided to try a booth at our local farmer's market. We decided to sell our fresh eggs, garden produce, and vintage kitchen gadgets, while also advertising our farm and showcase Alexis's beautiful Champagne D Argent rabbits she breeds. We decorated the booth with a "Farm Vintage" look so packed up my DIY Chalkboard Signs, vintage tablecloths, burlap banner, vintage tags, baskets, and all the items we wanted to sell. |
Showing posts with label salvage. Show all posts
Showing posts with label salvage. Show all posts
Vintage Display Shelves
Labels:
booth,
booth display,
craft show,
display,
DIY,
fair,
farm market,
farm vintage,
farmer's market,
homemade,
kitchen drawers,
party,
produce stand,
recycle,
reuse,
salvage,
table display,
upcycle,
vintage,
wood shelves
Moving a Shed
Moving a small gardening shed or
other small building is not impossible.
There's a couple of ways to move a shed; one takes hard work
and numerous people, but no lifting.
The second is to hire out the work.
We learned how to move a shed with PVC pipes and jacks from a guy who moved a shed for us about 20 years ago.
The shed was sitting directly outside my kitchen at our newly purchased home and in the center of the yard. Eyesore!
Building a Greenhouse (Part One)
A greenhouse has always been on my list of things I want to
help with gardening.
When we lived in
the burgs (city) our house had a 3 seasons room (sometimes called a Florida
Room in this area), which was the closest to owning a greenhouse I have been.
Because of all those windows it was easier to
get my seeds going in early spring. Having an actual greenhouse will give me a head start on
planting and will also extend my growing periods.
How a greenhouse works is simple. Sun streams through the windows and warms the surfaces inside. The glass or glazed panels trap the heat, keeping the temperature inside the greenhouse warmer than outside.
Because the sun is key, it is best to build the greenhouse on the south – southeast side of the house and away from the shadow of other structures or large trees.
Restoration of Original Chicken Coop
Our little farm was once a much bigger property with a white
clapboard farm house, a hand well pump and many outbuildings and barns. The original old farmhouse burnt down in the
1950’s and the property set neglected for many years.
In 1967 the property was divided up and sold at auction. A builder bought the current property and built a custom brick ranch on the exact spot where the old white clapboard farm house used to be.
The new house overlooked a large pond and pastures. He also built a large pole barn and raised cattle.
After 25 years, the builder divided up the property a little
more and sold more land and then sold the house too. The second owner stayed for approximately 20 years. While here he drained the pond and built
another pole barn for horses. We are the third owners.
Hillside Sidewalk and Stairs
There wasn't a patio here when we purchased our house 2 years ago. And no walk from the back door down to the garage.
Nothing but a worn path through the grass, which has mostly turned into DIRT. Ugh!
Last year we had a stamped concrete patio installed, but that still did not solve the problem of a walk and stairs down to the garage.
A couple months ago my son called from a construction job site where he was working so I could salvage the large 6 x 6 x 10 pressure treated beams from a playground being torn up.
Building a Chicken Coop
 |
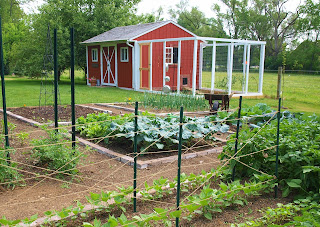
| Shed turned into coop & scratch yard built (near my garden) |
I had planned to use an old shed we call the “mail pouch” barn for the chicken coop, but after further inspection I realized it just needed too much work to keep the hens safe from predators.
Restoring this barn will have to wait. Maybe I'll turn it into a camping cabin, smoke house or use it as a sugaring shack for making maple syrup.
Instead, I decided to divide my gardening shed in half by building an interior wall. One side would be for my gardening supplies, and the other a chicken coop.
We had electric installed (thanks to my nephew Sammie) then started construction.
Salvaging Barn Wood
We sold our subdivision home in the city in June 2011 and purchased our small farm in August, 2011.
But even before we closed the deal, my husband Bill was on the look out, collecting things for our little farm.
One day, while driving by our not-yet-house just to look at it again, (we did that often) Bill happened upon a yard sale.
What's really strange about that is, he usually doesn't stop at yard sales. Me? I will wear the brakes out, screeching to a halt for a yard sale!
That day he found and purchased a load of old barn wood. Enough to fill the bed of our pickup truck.
We didn't know what we would use it for at the new house, but he said he just could not pass up all that weathered wood for only $25.00 .
After purchasing our little farm, Bill decided to use the barn wood on one wall in our lower level family room (The Man Cave).
Subscribe to:
Posts (Atom)


