
A greenhouse has always been on my list of things I want to
help with gardening.
When we lived in
the burgs (city) our house had a 3 seasons room (sometimes called a Florida
Room in this area), which was the closest to owning a greenhouse I have been.
Because of all those windows it was easier to
get my seeds going in early spring. Having an actual greenhouse will give me a head start on
planting and will also extend my growing periods.
How a greenhouse works is simple. Sun streams through the windows and warms the surfaces inside. The glass or glazed panels trap the heat, keeping the temperature inside the greenhouse warmer than outside.
Because the sun is key, it is best to build the greenhouse on the south – southeast side of the house and away from the shadow of other structures or large trees.

A Greenhouse Will:
- Provide crop shelter from hail, cold, frost, snow, high winds, or heavy rain.
- Provide better control over bugs, mice, rabbits or anything that can get into a garden.
- Extend the growing season up to a few months or, depending on your greenhouse, enabling year round crops.
I have been debating whether to purchase a greenhouse kit or
just build one myself. I decided to look
for old windows and build it myself.
I searched on Craigslist and found an ad for windows from a
woman who had new vinyl windows installed to replace her old wood ones.
I purchased most of the regular size windows for $2.00 a
piece and really large windows for $5.00 each, along with 2 old French doors.
There is an approximately 5' by 8’ concrete stoop off our
guest bedroom, along with sliding patio doors, so I decided to build the
greenhouse there. The location is on the
end of our house closest to my vegetable garden, on the southeast side of the house and right next to our patio. The door from the guest bedroom will allow easy access to the greenhouse doing cold
winter months. I can already see a small sparkling nature decorated Christmas
tree set up in the greenhouse, but I’m getting ahead of myself. First I must BUILD the greenhouse!
 |
| Glass sliding doors and concrete stoop is ground zero |
The first step is to draw up a plan of how the greenhouse
will look, how big it is going to be and to make a list of needed lumber and
supplies.
Plan, Plan, Plan! It is the most important step.
 |
| Written plans and dog paw prints |
I decided to use 2 x 4’s for framing and coated exterior
screws, which resist rust.
I usually have a stockpile of salvaged lumber and 2 x 4’s
but my wood pile is low so I had to purchase the wood, ouch!
Since the concrete patio stoop is 5 feet by 8 feet, that
will be the size of the greenhouse.
The roof needs to have a slant to allow rain and snow to drain, mine will end up with about a 4 ½ inch drop.
I also had to draw up where each window was going to be
placed and how to frame them in. I also spent the better part of one day
sorting and organizing the salvaged windows to find ones that would fit the
space.
I decided to use the two French doors as part of the walls,
and found another one I think would work.
The greenhouse is going to be lean-to style, meaning built
against the house and having only three walls and a slant roof.
Of course the official first day of construction was cloudy with rain off and on, rain seems to follows me.
I started by framing the two side walls. I have found it’s easier to build the wall first
on a flat surface or ground, then lift it into place.
This is the same method used when I built the scratch yard for the chicken coop.
Once the walls for the greenhouse were built, I secured each to the house and the concrete stoop by pre-drilling the screw holes and then using Tapcons to fasten into place.
This is the same method used when I built the scratch yard for the chicken coop.
Once the walls for the greenhouse were built, I secured each to the house and the concrete stoop by pre-drilling the screw holes and then using Tapcons to fasten into place.
 |
| Frame of one side wall |
Next I needed to decide where the door going from the
greenhouse to the patio was going to be.
There is one step going down to our patio from the stoop so the door
will be placed at that step. The front
wall had to be built in two sections, leaving an opening for a door, with
framing on both sides.
The door will be built later.
The door will be built later.
 |
| Left side of door frame |
 |
| Left side of door frame |
On this front wall I also decided to use my largest salvaged
window, a huge multiple paned picture window.
Using the window measurements, I build a frame to hold the
window tightly in place.
After the frame was built, I attached it to the two side
walls, and then used Tapcon (concrete screws) to secure the wall to the
stoop. My son Daniel and his friend
Charlie helped to set the window in place and then we attached it to the frame
with screws.
 |
| Front wall window framed in |
 |
| Large window installed on front wall |
 |
| Window framed and installed, door opening framed in and two side walls ready for windows |
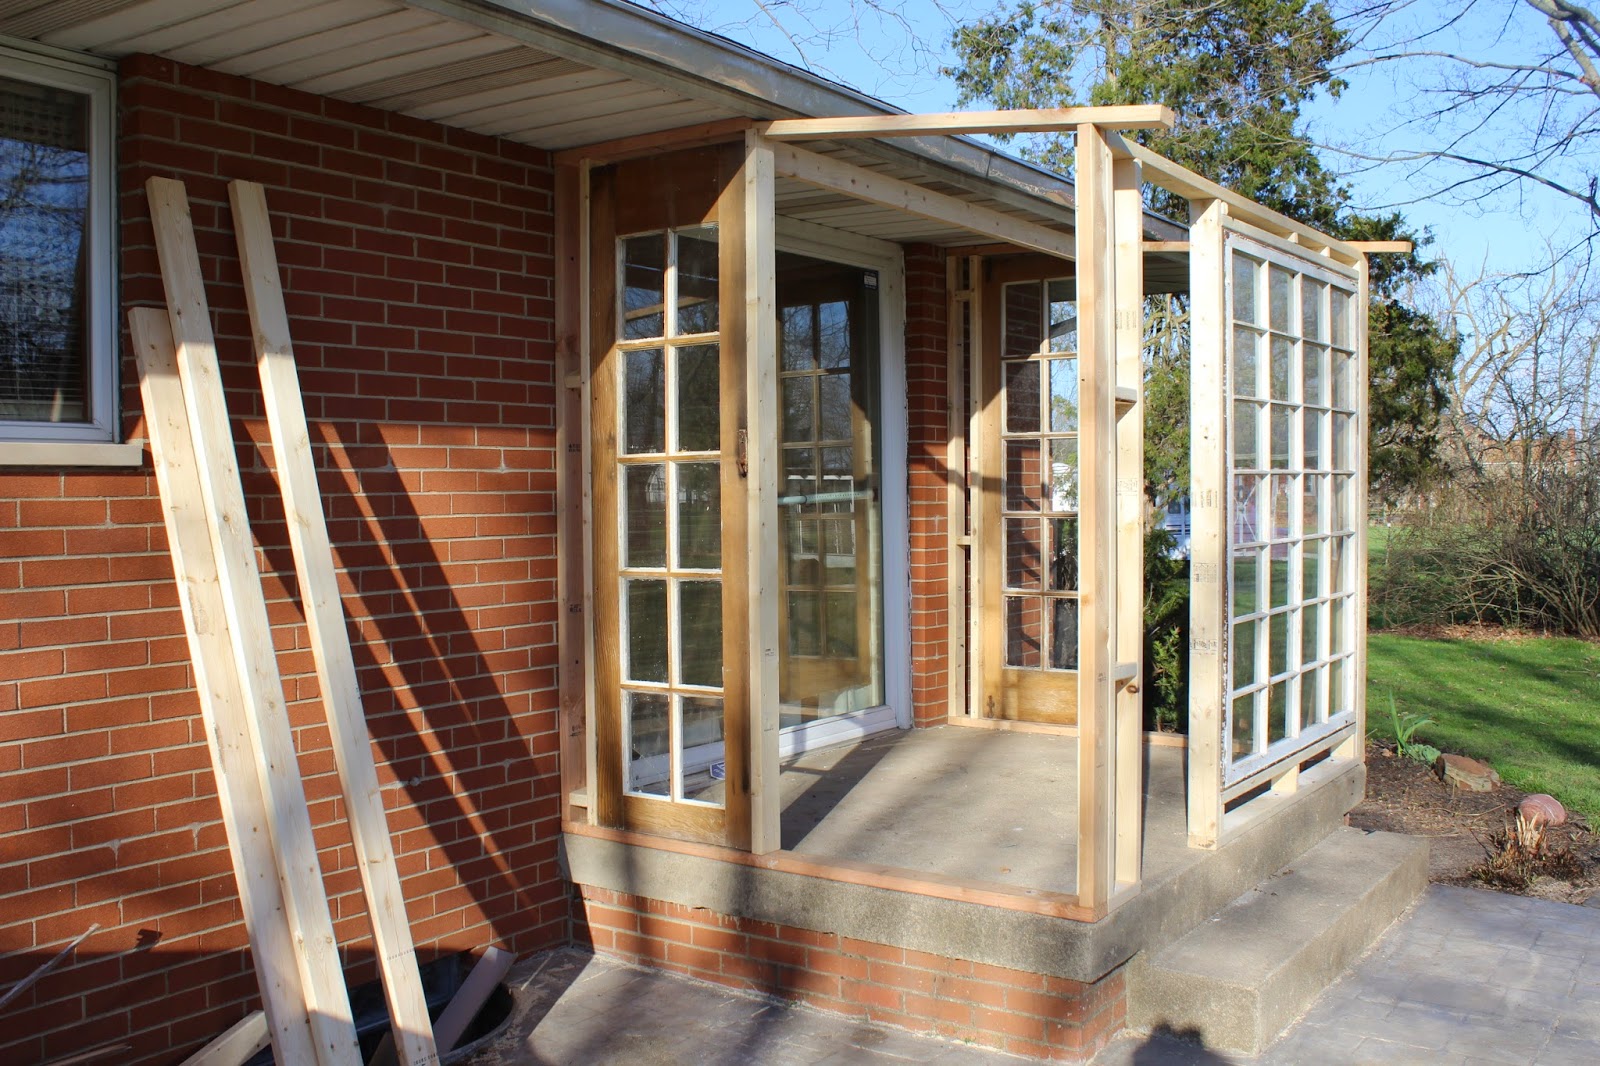
Nest was to place windows in the side walls. I decided to put one French door on each side
wall so built frames and set them into place.
 |
| My son Daniel was a huge help when needed |
The third French door I also framed facing our patio then
used smaller windows on the opposite wall, facing towards my garden.
 |
| 2 doors for side walls and large window in front. And door frame in place. |
 |
 |
| Finishing the last wall of windows |
When the three walls were complete, my husband Bill and I cut the roof rafters out of 2 x 4's and screwed
them on top of the three walls. I decided to lay the roof rafters on their side to give the roofing panels more support and give me more inside head space.
We have a four foot overhang all the way around our house. That overhang was incorporated as part or half of the greenhouse roof, which was my son Daniel's idea. And it worked great. The other half of the roof was constructed at a slant to allow rain or snow to drain off.
We have a four foot overhang all the way around our house. That overhang was incorporated as part or half of the greenhouse roof, which was my son Daniel's idea. And it worked great. The other half of the roof was constructed at a slant to allow rain or snow to drain off.
 |
| Roof rafters installed |

 |
| The hubby looking out at me. Next we will install the roofing panels and put up the wood siding |
Costs So Far:
$21.00 for the salvage doors and windows I used. (I still have many and may resell a few to recover any other costs)
Approximately $45.00 for 2 x 4's.
Approximately $15.00 for screws and Tapcons
For a total of $81.00 so far.
The roofing panels will cost about $20.00 a panel and the wood siding about $22.00 a sheet.
I'm hoping to keep the final cost under $350.00.
The Next Steps:
The Next Steps:
Painting the rafters before installing Suntuf Clear Polycarbonate Roofing Panel (from Home Depot).
Cover the three walls with T1-11 wood siding.
Add corner round trim inside the greenhouse around all the
windows.
Build and install the door.
Put new caulk around all the window panes and seal any
cracks in other places.
Install roof top or wall air vents. (will prevent
overheating)
And last, build potting benches. (I'll use scrap 2 x 4's and skids)
Things I’m
Considering:
Running electric to the greenhouse
Types of Ventilation
Using an RV Air Vent and Cap for ventilation
Installing retractable shade curtains or cloth or blinds
Having a heat source in the winter months
Keeping a Greenhouse Journal
(All the extras I am not including in the building costs because I don't "need" most of the things on this list. It is more of a "want" list.)
Check back soon for part two of building a greenhouse!
Check back soon for part two of building a greenhouse!
I am so excited about how my greenhouse is already turning out! Besides dreamily visualizing decorating it for the holidays I think I will add a small strand of white lights for summer patio dinner parties!
Elizabeth
Other Posts:
I wish I was as handy as you! Greenhouse is looking great and terrific blog by the way!
ReplyDeleteHey ya, first time to your blog. My husband has the windows already and this post is very useful & it helped out a lot about framing that he is now once again motivated to build my greenhouse, yea! Thanks! Linda and Dave
ReplyDeleteThanks Linda. My husband is not real handy when it comes to building so I have had to teach myself how to do it. Good luck with your greenhouse!
DeleteCongratulations on building a greenhouse, Elizabeth! It certainly looks great and classy. I'm sure the plants are going to grow well in there. I hope you can post photos of it when it's done. Thanks for sharing, and have a happy gardening! :) Refugia Stein
ReplyDeleteRufugia:
ReplyDeleteThank you and yes I will post more photos when I finish the greenhouse. It's mostly done except for trim work, caulk and paint but we have had the wettest summer ever here in central Ohio, so painting outdoors has been out of the question. I'm hoping as summer draws to a close the rain will decrease enough for everything to dry out. Thanks again! Elizabeth
This looks great. I saved all my windows when I had replacement ones installed. They weren't big like the ones you got though!
ReplyDeleteThanks Carla. Yea I got lucky finding those windows. A couple of them are even old french doors! Let me know if you decide to build a greenhouse and send me a photo or two, would love to see it. Elizabeth
ReplyDeletePretty good post. I just stumbled upon your blog and wanted to say that I have really enjoyed reading your blog posts.
ReplyDelete