
There wasn't a patio here when we purchased our house 2 years ago. And no walk from the back door down to the garage.
Nothing but a worn path through the grass, which has mostly turned into DIRT. Ugh!
Last year we had a stamped concrete patio installed, but that still did not solve the problem of a walk and stairs down to the garage.
A couple months ago my son called from a construction job site where he was working so I could salvage the large 6 x 6 x 10 pressure treated beams from a playground being torn up.
After speaking to the job site foreman, I was able to salvage 35 of them and boy are they heavy.
 |
| Sloping Yard without a sidewalk or stairs down to the garage. |
While my daughter and I were loading the 6 by 6's into our Ford F-150 pickup, I was already drawing up plans in my head for a sidewalk.
 |
| The dirt path down to our garage was ugly! |
The beams actually measure 5 ½ x 5 ½ inches wide, so if you decide to build a walk or anything with wood, take into account that lumber is no longer cut to the size stated.
For instance, a 2 x 4 is not actually 2 inches by 4 inches.
With about a 42 1/2 inch grade (or slope), I could make 7 steps, with 4 inches left over which meant I need to adjust one or two steps to make it all level.
About 2/3 of the way down our hillside are stairs going up to a covered back porch and deck area.
At the bottom of those stairs is a concrete slab. This was my starting point, and I worked my way up the hill to the patio.
To begin, we dug the dirt near the concrete slab down a couple inches so that the first step is braced against the concrete. This will help with stability and control any shifting that might occur.
I measured the same distance from the house out and along the entire area to make sure the walk would be straight all the way up the slope.
 |
| First step frame is against a concrete slab which helps with stability |
We cut the 6 x 6's and made a square, putting it in place and making sure it was level. In each corner, we attached an L-bracket to hold the 6 x 6’s together. Make sure to place the bracket far enough down that the cement, gravel or brick you are using will cover them. After the square was in place, we drilled holes into each 6 x 6 to install rebar. I love cordless screwdrivers and reciprocating saws. If you do not have one, you just don't know what you are missing. So easy to use and portable!
Step two was built the exact same way as step one, except the front of step two is resting on the back of step one. And the back of step two is resting on the ground, and so on, and so forth.
Both steps are the same distance from the house and the same width. The length of each step depends on the slope of the hill and getting the step level. Digging is involved in the process.
Once step two is level and all four corners are secured with L-brackets, we secured the two steps together where they are overlapping with a straight heavy metal bracket. My concrete guy, Shane told me we probably could have used larger brackets, so keep that in mind if you decide to construct a similar walk.
Again we drilled holes into the 6 x 6’s and installed rebar to hold the step in place and to help prevent shifting.

I was of the opinion that we should shave off 2 inches from the bottom of one of the 6 x 6’s, which would cause the last step to set 2 inches lower and end with the walk level with the patio.
The last step or top step was also the longest and on the least sloped part of the hill.


As you can see by the above photo, I did not waste one minute in starting to landscape the area!

We were impressed with Shane's work and attitude so much that we asked him finish building the remainder of the walk area, which was from the concrete slab, turning and descending steeply down to the garage. And Shane pretty much stayed with my original design.

Salvaging the 6 x 6’s and doing most of the work ourselves saved us a lot of money and gave us a total cost of approximately $1300.00. We are still amazed at how well our step frames turned out
and we think it all looks amazing!

This area is under my large Maple trees so we're using shade plants for landscaping which will include lots of hostas, and I will also need to reseed the grassy area.
Hope your Do-It-Yourself projects are turning out as well as you had hoped. Send me photos, I would love to see them!
Elizabeth
Other Posts:
Building a Greenhouse (Part One)
Easy to Build Wine Rack
Building a Chicken Coop
UPDATE:
I receive quite a few emails and messages with questions about this sidewalk and from people thanking me for sharing my design. Recently Stace Drumm, from Norwalk, Ohio sent me photos of their hillside stairs project and it looks fantastic!
Thanks so much Stace for sharing and your home is beautiful!
Here are Stace's photos!
 |
| Re-bar used to hold steps in place |
Anyway, the rebar is pounded into the wood, and into the ground to hold the 6 x 6's in place. Because we're using salvage or "used" 6 x 6's there are already a few holes drilled into the wood.
We dug out the inside of each square or step to make room for a gravel foundation later.
We dug out the inside of each square or step to make room for a gravel foundation later.
The first step is complete!
 |
| 1st step complete |
Step two was built the exact same way as step one, except the front of step two is resting on the back of step one. And the back of step two is resting on the ground, and so on, and so forth.
 |
| The front of step two is resting on the back of step one |
Both steps are the same distance from the house and the same width. The length of each step depends on the slope of the hill and getting the step level. Digging is involved in the process.
A lot of digging.
 |
| Working on step three, heading up the hill |
Once step two is level and all four corners are secured with L-brackets, we secured the two steps together where they are overlapping with a straight heavy metal bracket. My concrete guy, Shane told me we probably could have used larger brackets, so keep that in mind if you decide to construct a similar walk.
 |
| Metal brackets holding the frames together |
Again we drilled holes into the 6 x 6’s and installed rebar to hold the step in place and to help prevent shifting.
Step Two is done!
All steps were completed in the same way.

When we got to the last two steps, near the patio, I needed to adjust for the extra inches mentioned earlier. Since we had lowered step one below the concrete slab in the beginning, I was only a couple inches off from the last step meeting the patio completely level. This, my friends, was the head scratcher and took a few minutes to figure out.
 |
| Our construction inspector, Lucas |
I was of the opinion that we should shave off 2 inches from the bottom of one of the 6 x 6’s, which would cause the last step to set 2 inches lower and end with the walk level with the patio.
Just at that moment, my son Daniel came outside. After explaining the dilemma, he was the one who suggested just lowering the back 6 x 6 post of the next to the last step.
Remember: Work smarter, not harder.
Remember: Work smarter, not harder.
So, the second step down from the patio, we dug out and lowered the back of the step's 6x6 post 2 inches below the rest of the step frame, and then attached the L-brackets. This made the last step just slightly, but not noticeably lower than the rest of the steps but made the step end level with the patio.
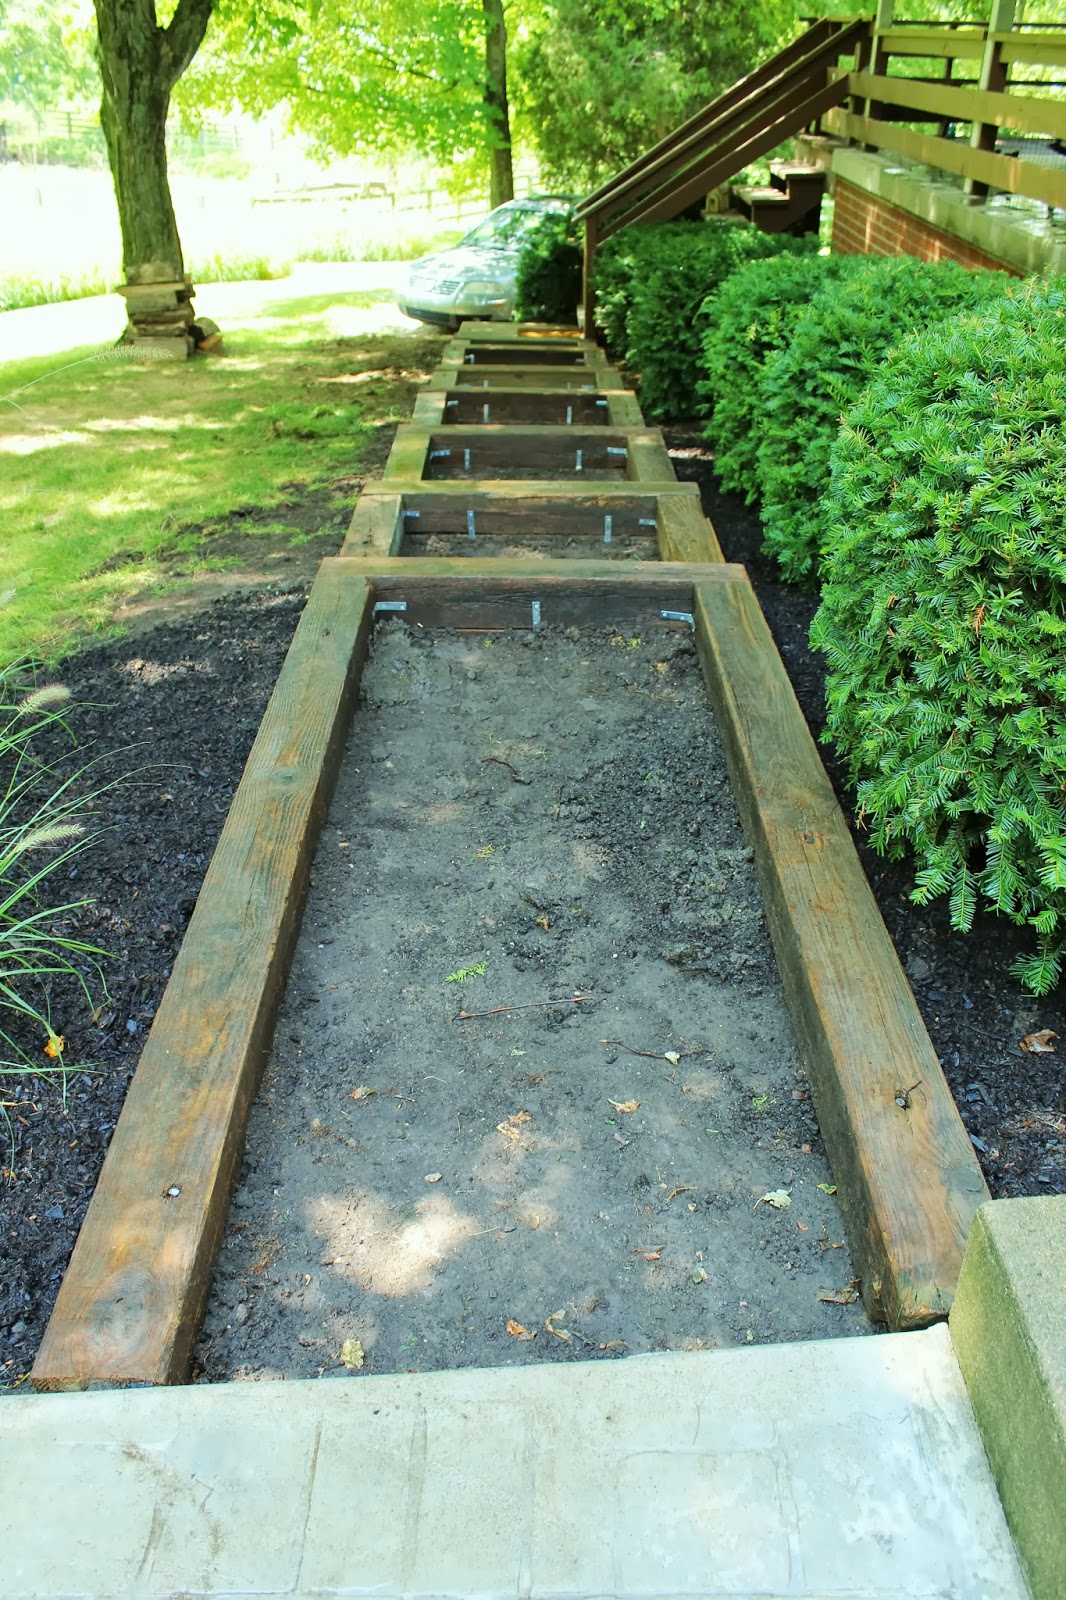 |
| Frame is complete and ready for a stone foundation |
After all the frames were complete, we filled each with about 2 to 2 ½ inches of #304 Limestone.
There is a difference in which rocks or stone you use. Regular #304 is nothing more than busted up concrete pieces. #304 Limestone (which is limestone) sets up firm and makes a much better foundation in which to pour concrete over. I suggest you install the gravel foundation if you are installing brick or pea gravel too.
There is a difference in which rocks or stone you use. Regular #304 is nothing more than busted up concrete pieces. #304 Limestone (which is limestone) sets up firm and makes a much better foundation in which to pour concrete over. I suggest you install the gravel foundation if you are installing brick or pea gravel too.

We had originally thought we might just put pea gravel in each step, or maybe brick each one. But after further thought, we decided to have concrete poured into each one.
My nephew Sammie recommended a company called Joshua Tree. The owner, Shane Gemmell did a great job and at a reasonable price.
He even covered the 6 x 6's so no concrete would get on them.

As you can see by the above photo, I did not waste one minute in starting to landscape the area!
We had other quotes to do the sidewalk, one for $3000.00 before we starting building the frames and another for $2800.00 with most of the framing complete! Way way more than we were willing to pay and in our opinion, way over priced for the job. And when one contractor said he would have to saw through many of my Maple tree roots, I cringed.
These are the trees I tap for Maple Sap to make syrup.
These are the trees I tap for Maple Sap to make syrup.

We were impressed with Shane's work and attitude so much that we asked him finish building the remainder of the walk area, which was from the concrete slab, turning and descending steeply down to the garage. And Shane pretty much stayed with my original design.
 |
| Stairs turning the corner to go to the garage |
 |
| View looking down at the turn to the garage |

Salvaging the 6 x 6’s and doing most of the work ourselves saved us a lot of money and gave us a total cost of approximately $1300.00. We are still amazed at how well our step frames turned out

This area is under my large Maple trees so we're using shade plants for landscaping which will include lots of hostas, and I will also need to reseed the grassy area.
Hope your Do-It-Yourself projects are turning out as well as you had hoped. Send me photos, I would love to see them!
Elizabeth
Other Posts:
Building a Greenhouse (Part One)
Easy to Build Wine Rack
Building a Chicken Coop
UPDATE:
I receive quite a few emails and messages with questions about this sidewalk and from people thanking me for sharing my design. Recently Stace Drumm, from Norwalk, Ohio sent me photos of their hillside stairs project and it looks fantastic!
Thanks so much Stace for sharing and your home is beautiful!
Here are Stace's photos!
 |
| Stairs from the front door down to the garage |
 |
| Stairs framed in |
Even your dog thinks you did a great job! hehe, It looks much greater when you do them. I'm thinking about doing something like these concrete steps in my backyard. Thanks for the ideas.
ReplyDeleteCeline: Thanks for taking the time to read my blog! These steps were easier than I thought they would be, once I did the figuring for measurements and drew up the plans. That sounds much more sophisticated then it is, my drawings are pencil scribbles that usually only I can decipher, haha. It helped that I hired a guy to pour the concrete once we finished the frames. I am not a concrete person, yikes!
ReplyDeleteThis comment has been removed by a blog administrator.
ReplyDeleteGood post. I learn something new and challenging on sites I stumbleupon on a
ReplyDeletedaily basis. It will always be interesting to read
articles from other authors and use a little something from their sites.
Great, glad my post was useful to you!
ReplyDelete
ReplyDeleteOutstanding story there. What occurred after? Thanks!
I'm continuing to landscape along the entire sidewalk / steps, which is looking fantastic. I may post a recent photo (one year later) to show how big the plants have grown and which plants I used. Many had to be shade loving plants because of the large maple trees in this area.
ReplyDelete
ReplyDeleteI drop a comment whenever I appreciate a post on a website or I have something of valuable to contribute to the conversation. Usually it's a result of the passion displayed in the articpe I read. And on this article "Hillside Sidewalk and Stairs". I was moved enough to drop a thought :-) I actually do have a few questions for you if you usually do not mind. Could it be simply me or does it look as if like some of the remarks appear as if they are left by brain dead folks? :-P And, if you are writing on other places, I'd like to keep up with you. Would you make a list of all your community sites like your twitter feed, Facebook page or linkedin profile? Thanks
Thanks for the compliment on my blog, much appreciated! I have a Facebook page for our farm called Lynch's Mt. Horb Farm. If you scroll to the top, a link is in the right had column. Thanks again!
ReplyDeleteWow, thanks for posting this!! Great idea, love the simple design -- I'm a lumber hoarder/dumpster diver myself & will totally bring my truck to a screeching halt for pallets, LOL! I am just finishing a new post on some redneck construction of my own; my projects never turn out this pretty as my budget is $0, but I know how much work it is to write it all up so nicely and I so appreciate folks sharing. You never know how ideas can be adapted!!!
ReplyDeleteeventer79, I love to find lumber, that's at the top of my list! But I also collect bricks, cinder blocks, pallets, fence, well anything I think I could use for something. I try to keep all of it stacked out of sight behind the barn. My budget for projects is usually never zero, as it seems I always need to purchase nails, screws, hinges, braces, brackets or something to finish up. But most of my projects cost a fraction of what others are paying to have similar jobs done. Good luck with all your "redneck construction" projects!
DeleteJust wanted to say fantastic blog!!
ReplyDeleteThanks, very much appreciated!
DeleteI loved your article, I love the long shallow steps. These types of steps are usually what we have to build even with or without a slope for our elderly parents to navigate. This is a fantastic idea that we can incorporate into the building of steps from our front patio down to our soon to be pool decking. Thank you!
ReplyDeleteYou're welcome Darla, hope your steps turn out great! Sounds like you have a beautiful outdoor space with a patio and pool!
DeleteGreat idea! We're looking for something like this for the backyard, from the deck down to the garage. Thanks for the great idea!
ReplyDeleteYour welcome, glad you can use this idea
DeleteWe bought our house 4 months ago & have landscape steps similar. They were filled in with rock & neglected for years...Lots of dirt & weeds now. I want to dig it out & pour concrete between the timbers. I have been told tis was a bad idea due to our freeze thaw. How have your steps held up? Any issues?
ReplyDeleteSteps are holding up amazingly and no problems. Wood actually shrinks in cold so will not press on the concrete. As for rain or dampness, wood becomes softer so would not press on the concrete in wet weather either. Also, make sure to use pressure treated wood to last outdoors.
DeleteOur steps have been in for 3 years and Ohio is the queen of freeze/thaw! There are no cracks or any other problems. Because it's a hillside there's plenty of drainage so that may help.
ReplyDeleteWe packed the dirt first in each step, added gravel as a base then had the concrete poured. Also the wood we used for the frame is pressure treated. I'm not sure where the idea comes from that it would not work because of freeze/thaw unless the steps are prone to being in a lot of water. Since you already have the wood forms in place, most of the hard work is already done for you in my opinion. If you are not a whiz with math, getting the steps to align correctly with the hillside is not an easy task. Please let me know how it works out for you and I'd love to see pics of the finished steps! Elizabeth
What is the width of your walkway? Looks close to 42".
ReplyDeleteThis comment has been removed by the author.
DeleteThe frame is approximately 42 inches wide and the concrete is 32 inches wide. Although the wood used for the frame are 6 x 6's, they actually measure 5 1/2 x 5 1/2.
ReplyDeleteI like it! Nice work. I shall follow you...
ReplyDeleteI am using your idea on a existing set of steps, wrapped the steps with 6x6. It is turning out great. Wish I could add photos
ReplyDeleteThis comment has been removed by the author.
DeleteSend the photos to my email address along with your name (if you want) and state you're in and I'll add them to the post! Would love to see how they're turning out!
ReplyDeleteDug around, but could not locate your email address. Im not so good at these things:)
DeleteNo problem. I can draw up plans for these stairs on a hillside, and even figure the drop and grade, but the kids had to show me most of the working of the internet, ha!
ReplyDeleteHere's my email address: ohiothoughts@yahoo.com
Pics sent, email subject says before,doing,goal.from Stace :)
DeleteDid you seal your steps? They look amazing. Ive been looking/for a design like the long shallow steps to help hubby
ReplyDelete. Bad knees. Hurts to climb our stairs.
L.Sexton: Yes, the wood we used was pressure treated, which resists termites and decay. And we sealed the concrete once it dried. A sealer will keep water from penetrating the concrete. Water is the enemy. Being on a hillside also helps with water drainage.
ReplyDeletePretty! This has been an extremely wonderful post. Many thanks for supplying this info.
ReplyDeleteKeep this going please, great job!
ReplyDeleteHave you ever considered writing an ebook or guest authoring on other websites?
ReplyDeleteI have a blog based on the same topics you discuss and would really like to have you share some stories/information. I know my audience would vlue your work.
If you are even remotely interested, fedl free to send me an e-mail.
how long was the rebar you pounded in the ground to stabilize the box frame?
ReplyDeleteThis blog was... how do I say it? Relevant!! Finally I
ReplyDeletehave found something that helped me. Many thanks!
Saved as a favorite, I like your website!
ReplyDeleteI would also like to know how long the rebar is. Thanks
ReplyDeleteRebar was aprox 2 ft
DeleteAppreciate this post. Will try it out.
ReplyDeleteGreat post! Just one question, how do you figure out the math for the steps? Sounds complicated and I have a pretty steep hill to conquer. Any help would be greatly appreciated!
ReplyDeleteThis comment has been removed by a blog administrator.
ReplyDeleteYou need to find the difference between the top of the stairs to the bottom the stairs. So if, say the difference between the two floors is 8 feet, you need to see how many steps will fit in that 8 feet distance. A step is usually around 7 1/2 inches from one to the next.
ReplyDeleteI had a steep but short hill, and a spot the stairs had to end up at which caused additional problems. So in order for me to get the steps to end at the desire spot, yet could only have so many "step downs" I had to make long stretches of walk, then a step, then a stretch again. The photos show this.