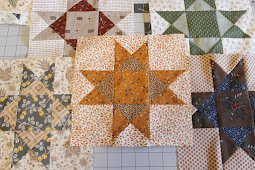
I made my very first quilt, a Patchwork Quilt to go along with our Camper Remodel in January, and have since been asked by most of the kids and grandkids to make them all quilts!
Ohio Star History
There seems to be a k-zillion Ohio Star quilt block pattern variations, and each time something is done to the Ohio Star someone gives it a new name. Variations include tilting the star, adding blocks to the corners, using a diamond or other shapes within the center square, or infinite color combinations.
The pattern for the Ohio Star is believed to have been around since the early 1800s, and some believe it was invented in 1815. But according to Tredyffrin Easttown Historical Society, stars very similar were used in Martha Washington's quilt where she added a pinwheel as the center square and Dolly Madison used an Ohio Star with a nine-patch inserted in the center, both well before 1815. Below are examples of Dolly Madison's quilt block.
There seems to be a k-zillion Ohio Star quilt block pattern variations, and each time something is done to the Ohio Star someone gives it a new name. Variations include tilting the star, adding blocks to the corners, using a diamond or other shapes within the center square, or infinite color combinations.
Variations of the names when the star is changed include Variable Star, Eastern Star, Western Star, Texas Star, and Missouri Star. But they all seem to be basically the Ohio Star.
Below is the Missouri Star, a Christmas-themed Ohio Star, and an Amish Star.
The Ohio Star is a lot of cutting and sewing and a little intense for a beginner quilter like me but after the second or third block, I pretty much mastered it. Mostly.
I've made a few noticeable mistakes on the first blocks but as of now have not taken the seam ripper to them. I think I will leave the mistakes to mark the day I taught myself how to make the Ohio Star quilt block. And besides, most old vintage quilts have their share of small mistakes, which only adds character to the quilt, in my opinion.
I've made a few noticeable mistakes on the first blocks but as of now have not taken the seam ripper to them. I think I will leave the mistakes to mark the day I taught myself how to make the Ohio Star quilt block. And besides, most old vintage quilts have their share of small mistakes, which only adds character to the quilt, in my opinion.
For my Ohio Stars, I decided to use reproduction Civil War fabrics after purchasing a book from an Amish Quilt store in Sugarcreek, Ohio. The book, “The Blue and the Gray, Quilt Patterns using Civil War Fabrics” actually has multiple quilts I love and patterns I want to try. Below on the left is the quilt I'm making using reproduction fabrics and the second one on the right, I'm making for the hubby.
I decided to make my quilt blocks 9-inch square and hope to keep sewing them until I have enough for a King size quilt. Phew, that's going to be a lot of sewing!
How to Make the Ohio Star
The Ohio Star pattern actually works off of a 9 patch. Truthfully once I learned to look at quilts by blocks and squares (the trees instead of the forest), patterns became much easier for me to figure out.
 |
| Ohio Star works off of a 9-patch or 9 squares |
The Ohio Star block has three rows of three (nine). Since mine will be a 9-inch block, each square in each row needs to end up after sewn to measure 3” by 3”.
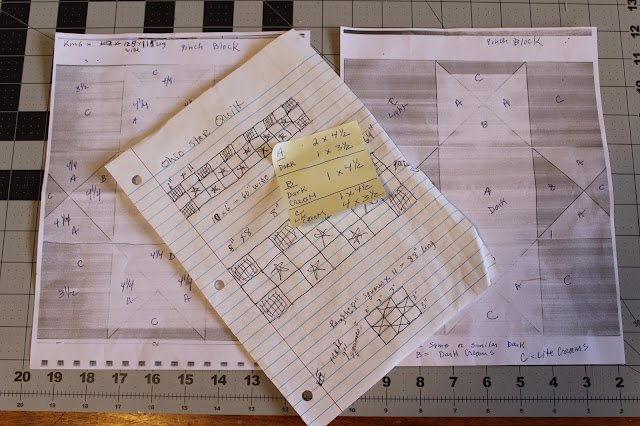
I printed a diagram of the Ohio Star and made notes (lots), and also made a list of the sizes and numbers of each square I needed to make one block. Doing this helps me to visualize it and work out how to sew it together.
 |
| My notes and diagrams before making the Ohio Star |
What you'll need for one 9 inch block:
You can use many different color combinations to create the Ohio Star.
For the main color of the Ohio Star (A- Dark) cut 2 at 4 ½ x 4 ½
For the accent color (B-Med or dark cream or coordinating color) cut 1 at 4 ½ x 4 ½
For the corners and border (C-Light cream) cut 1 at 4 ½ x 4 ½ and 4 at 3 ½ x 3 ½
 |
| The diagram I made showing what colors go where |
First, place one A-Dark and one B-Med together, right sides facing each other.
Draw a line diagonally across the squares. At the same time, place one A-Dark and one C-Light (4 ½ x 4 ½ ) together, right sides facing each other. Draw a diagonal line across the squares.
 |
| Draw a line across the squares |
Now stitch a ¼ seam along each side of the line on each one.
Cut on the line you drew. Open and press seams.
 |
| Stitch a 1/4 seam allowance and cut |
 |
| Press open |
Matching the seams exactly (this is the hardest part and where I made mistakes) place one A/B combo and one A/C combo together. Draw a line diagonally across them.
Repeat. Now sew a ¼ inch seam allowance on each side of the line.
 |
| Align seams |
 |
| Draw a line, sew a 1/4 inch seam on each side |
Cut on the line and then open and press seams.
You now have the points of the Ohio Star complete!
 |
| The points of 4 Ohio Star quilt blocks ready to be trimmed |
Make sure to trim around all the edges to make each 3 ½ ” x 3 ½ ”
I use a square template with the lines highlighted and placed in the center of each square and trim one side at a time.
 |
| Trim each to a 3 1/2 inch square |
Once these are sewn and trimmed you have 4 squares of quarter sewn triangles.
Place all the pieces of the Ohio Star into place and begin sewing them together. Make sure the seams are aligned when sewing.
I prefer to first sew the top three squares together, then the middle three and finally the bottom three.
Press the seams, then sew the three rows together.
Most importantly, make sure to line up all the seams!
Also, check to make sure that once the block is sewn together, there is a ¼ seam allowance above each star point.
 |
| Seam allowance and example of seam not matched up correctly! |
If you wish to make your Ohio Star Blocks a different size, I found this amazing chart on the website: Generations Quilt Patterns:
It made it extremely helpful to cut the right sizes for the size block I wanted.
I also found it's easier and goes faster if I sew multiple blocks at once. I precut blocks and place each one in a sandwich bag. This helps to keep the block organized until I'm ready to sew it together. Some days I have limited time so I'll just cut out the blocks to sew another day.
 |
| Finished Ohio Star Blocks and block pieces cut and ready to go |
I working on my granddaughter Kelsey's quilt as a graduation gift and also my daughter Alexis's quilt made with hexagons.
This quilting stuff is addicting! I was told by my kids that they're doing a quilting intervention.......
right after I finish their quilts.
Elizabeth
Other Posts:


Its like you read my mind! I've been wanting to try the Ohio Star and you wrote easy directions and guide. This is an excellent blog by the way. A great read. I will definitely be back.
ReplyDeleteI did exactly the same thing. I have been diligent in selecting fabrics that would have been applicable to that era. I am stuck on how to quilt in. I want to machine quilt, but I can't decide on a pattern. What did you do?
ReplyDeleteTerri:
ReplyDeleteI haven't finished my Ohio Star Quilt quite yet, ugh. It's a quilt I'm working on for myself in-between numerous other quilts for family members. But, when I do finish it I'll take it to a lady near me who does the top stitching with a machine (longarm). I would love to hand stitch the quilt but just don't have enough hours in a day. And I think hand stitching would be staying true to the reproduction Civil War quilt too.
As for a pattern for machine stitching, I always try to choose something that relates to the quilt. For a kids batman quilt, I used a bat pattern. For my fall quilt, I used a maple leaf pattern. I may just go with a plain design or symmetrical one. She has hundreds so this one may be harder to choose than the rest.
Elizabeth thanks for all the information on the Ohio Star. I had no idea it has been around that long. And great directions and tips, thanks! Tara
ReplyDeleteElizabeth. I clicked onto your blog while researching the origin of the Ohio Star quilt pattern. I just purchased a ready made quilt, but now am thinking of making my first quilt. (I'm retired but have sewn just about everything since I was a child.) Your step by step instructions are wonderful. We RV quite a lot and a handmade quilt would be a wonderful on the road project. Thanks so much for the inspiration. Jeannie C
ReplyDelete